

AI Audio Summary and Discussion
Want to learn about this topic in the background? Give this AI-generated audio summary a listen (created using NotebookLM).
Revit models tend to contain messy data. Room names are one element parameter where we have noticed inconsistencies. For example, some Elevator shafts might be named “Elevator”, “Elev”, or even “Elvator” (a difficult-to-catch misspelling). It’s challenging to coordinate standardized Room names across project teams, where designers are manually entering in Room names as they are drawing, often under pressure to meet a pending deadline.
Consistent data, however, can provide firms with advantages. Standardized names and clean data allow project teams to query information from their portfolio of projects and gain insights from their work. When parameters are consistent from project to project, teams can analyze data and pick up on trends in their markets or areas of focus. This knowledge can be leveraged to help project teams explain design decisions and back up their experience with numbers.
While the status quo for models might be inconsistent or otherwise messy labeling, a utility in LunchBox can simplify label clean up. This article provides step-by-step instructions for preparing a simple Grasshopper script that will swap out a variety of Revit room names with standard labels.
Additionally, while this article uses Room Names as an example, the same workflow can be used to clean up other Element Parameters too.
Prerequisites
- Rhino 8 (Service Release 12 or newer), Grasshopper, Rhino.Inside.Revit, and Revit.
- LunchBox for Grasshopper, Version 2025.04.10.0 (Release date: 10 April 2025) or newer
Part 1: Use Rhino.Inside to get the current Revit Room Names

Before you can correct and standardize Revit room names, you’ll need to query them from your Rhino model and create a list of Room names in Grasshopper.
- Find the “Revit” panel in your Grasshopper Ribbon Window. This is where the Rhino.Inside components are located.
- Use the “Built-In Categories (Categories)”, “Category Filter”, and “Query Elements” components to create a list of Revit elements from the Rooms category. You are able to select “Rooms” from the Built-In Categories component by scrolling down in the list and clicking on the word “Rooms”.
- Use the “Element Parameter (Param) component and enter the value “Name” into the Parameter field to create a list of Room Names. This will return a list of all Room Names from the Revit model in the “Values” field.
Part 2: Create or import a list of Standardized Room Names

You will need a list of standardized Room Names for LunchBox to reference. These will be used to relabel the room names in Revit. You can create the list directly in Grasshopper or import a list from a .csv or Excel file. LunchBox provides data management components that can read and write Excel and .csv files.
Part 3: Use LunchBox’s String Distance Component
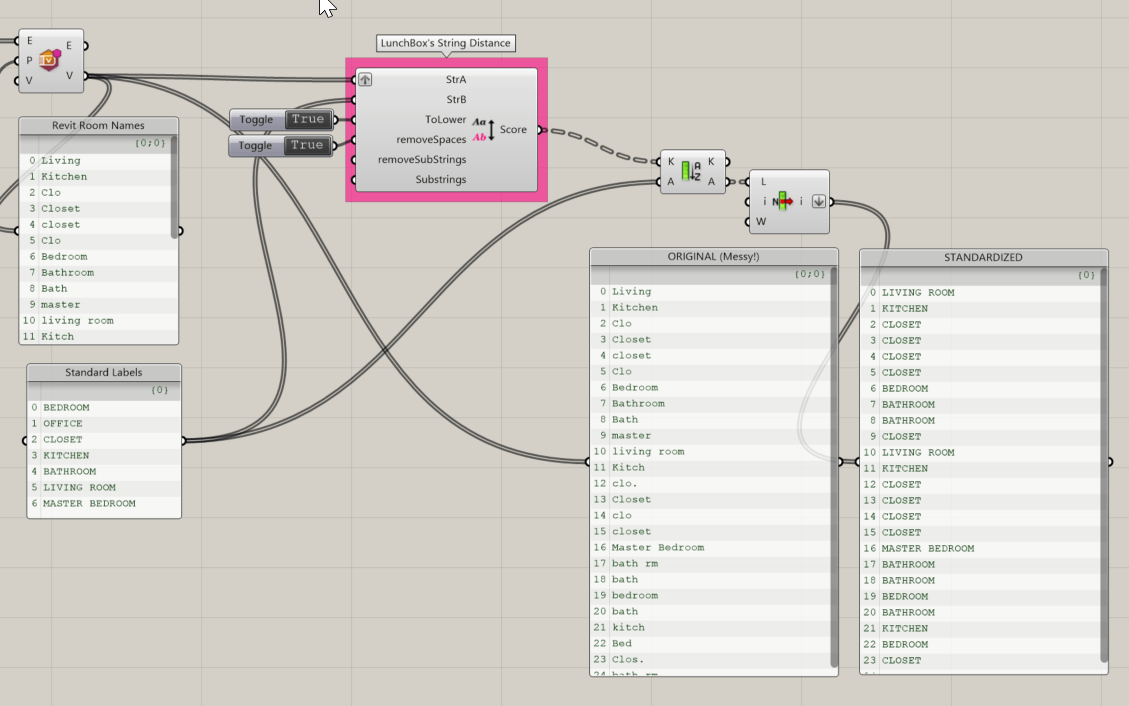
Next, you’ll pipe the existing room names and the standardized room names lists into the LunchBox “String Distance” component.
The String Distance component evaluates the distance (or text-based difference) between two strings of text using a Levenshtein algorithm. A distance of “0” represents a perfect string match. Higher scores indicate greater distance between the strings. In other words, this component compares the two lists and can help you determine which Standardized Room Name is most similar to the Room Name in your Revit model based on their common letters.
To use this component, enter the list of Room Names from your Revit model into the “String A” field, and the list of Standardized Room Names into the “String B” field. Set the “To Lower” field to True, as this will convert all list items to use lower case characters for the algorithm to compare based on the individual letters and to ignore case. Set the “Remove Spaces” field to True, as this will convert all list items to remove spaces for the algorithm to disregard spaces in room names as it compares similarity by letter only.
The component will return a list of scores. Use the “Sort List” component to sort the list of Standardized Room Names so that each Room from your Revit model has a list of Standard Names where the highest scoring name is first in the list. Then, use a List Item component to select the first item from each of these nested Room Name lists. The selected item will be the string from the Standardized Room Names list which most closely matches the name of the Room in the Revit model.
Part 4: Use Rhino.Inside to rename Revit Rooms

You are able to use the “Element Parameter (Param)” component to rewrite parameter values in your Revit file. Enter the “Elements” data from the Query Elements component, used earlier, into the “Elements” field. Enter the “Name” text value into the “Parameter” field”. Then enter the new list of Standardized Revit Names into the “Values” field. This will overwrite the names of the rooms in your Revit model.
This component does not have a toggle input to control when it runs, so you may wish to disable the component until you are ready for it to run — especially if you have a large Revit model with many room names. You are able to enable and disable components in Grasshopper by pressing on the click wheel on your mouse and choosing the component icons labeled Enable/Disable. Another way you can enable or disable a component is by right-clicking on the component and clicking on the “Enabled” or “Disabled” item to change its status.
You made it to the end! Thanks for following along. Have questions? Reach out to our team at apps@provingground.io.